
Sitecore 9.0 Update – 1 has been launched recently. I got a chance to install it. During my insallation, I listed down the steps which I performed.
Prerequisites:
- Windows 10
- MS SQL Server 2017
- MS SQL Management Studio
- .Net Framework 4.6.2 or later
- Web Deploy 3.6
- SOLR 6.6.2
- Java Runtime Environement
- NSSM
- Sitecore 9.0 Update -1
- Sitecore License file
Step – 1:
- Install Windows – 10 on your machine
- Enable IIS using Turn Windows Feature on
- Install Web Deploy 3.6
- Install Java Runtime Environement (64 bit)
- Set JAVA_HOME
Step – 2:
- Install MS SQL Server 2017 in mix mode.
- Install MS SQL Management Studio 2017
Step – 3:
- Create a new folder D:\SC91_INSTALL
Step – 4:
- Download SOLR 6.6.2
- Copy and past it to D:\SC91_INSTALL and unzip it
- Open command prompt in administrator mode and run solr start -p 8983 as per given in the screenshot
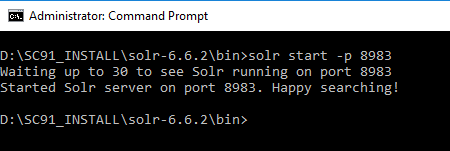
- Open browser and navigate to http://localhost:8983/solr
Step – 5:
Host solr using windows services and make it secure (HTTPS)
- Install NSSM
- Copy and paste nssm-224.zip to D:\SC91_INSTALL
- Unzip NSSM
- Open command promort in administrator mode
- Go to D:\SC91_INSTALL\nssm-2.24\win64\
- Execute command :
nssm install Solr_6.6.2
A popup will come. Provide below informations:
Path: D:\SC91_INSTALL\solr-6.6.2\bin\solr.cmd
Arguments: start -f -p 8983
Click on Install Service - You will get the success message.
- Run windows services Solr_6.6.2

Step – 6:
Host Solr service on secure (HTTPS)
- Download solrssl.ps1 and copy it to D:\SC91_INSTALL
- Open Power Shell in administrator mode
- Execute below command
Set-ExecutionPolicy Unrestricted - Go to D:\SC91_INSTALL
- Run the downloaded script (.\solrssl)
- It would aks the keytool path so provide it C:\Program Files\Java\jre1.8.0_161\bin\keytool.exe
You will find it where you have install Java runtime. - It will generate two files at D:\SC91_INSTALL (solr-ssl.keystore.jks and solr-ssl.keystore.p12)
- Copy these files to D:\SC91_INSTALL\solr-6.6.2\server\etc
- Open D:\SC91_INSTALL\solr-6.6.2\bin\solr.in.cmd in notepad and append the below lines at the end
–
set SOLR_SSL_KEY_STORE=etc/solr-ssl.keystore.jks
set SOLR_SSL_KEY_STORE_PASSWORD=secret
set SOLR_SSL_KEY_STORE_TYPE=JKS
set SOLR_SSL_TRUST_STORE=etc/solr-ssl.keystore.jks
set SOLR_SSL_TRUST_STORE_PASSWORD=secret
set SOLR_SSL_TRUST_STORE_TYPE=JKS
set SOLR_SSL_NEED_CLIENT_AUTH=false
set SOLR_SSL_WANT_CLIENT_AUTH=false - Restart Solr_6.6.2 service
- This time open solr using secure URL (https://localhost:8983/solr)
Step – 7:
Enable contained Database Authentication
- Launch MS SQL Server Management Studio and login as an administrtor
- Run the below following query:
sp_configure ‘contained database authentication’, 1;
GO
RECONFIGURE;
GO
Step – 8:
Keep your Sitecore community credentials ready. You will have to login to download Sitecore 9.0 Update -1. This is available only for the Sitecore Certified Professional.
- Download and unzip package for XP single
- Copy and paste the following zip files to D:\SC91_INSTALL
Sitecore 9.0.1 rev. 171219 (OnPrem)_single.scwdp.zip
Sitecore 9.0.1 rev. 171219 (OnPrem)_xp0xconnect.scwdp.zip - Unzip XP0 Configuration files 9.0.1 rev. 171219 and copy and paste all the files to D:\SC91_INSTALLsitecore-solr.json
sitecore-XP0.json
xconnect-createcert.json
xconnect-solr.json
xconnect-xp0.json
Step – 9:
Put your Sitecore license file at D:\SC91_INSTALL
- Download sc9_install.ps1 and move it to D:\SC91_INSTALL
- Open this file in notepad and made the following changes:
$prefix = “SC91”
$PSScriptRoot = “D:\SC91_INSTALL”
$XConnectCollectionService = “$prefix.xconnect”
$sitecoreSiteName = “$prefix.sc”
$SolrUrl = “https://localhost:8983/solr”
$SolrRoot = “D:\SC91_INSTALL\solr-6.6.2\”
$SolrService = “Solr_6.6.2”
$SqlServer = “Machinename\InstanceName”
$SqlAdminUser = “sa”
$SqlAdminPassword=”sa_password”
Step – 10:
- Open Windows Powershell in administrator mode
- Execute the below command on Powershell:
Register-PSRepository -Name SitecoreGallery -SourceLocation https://sitecore.myget.org/F/sc-powershell/api/v2
Install-Module SitecoreInstallFramework
Install-Module SitecoreFundamentals
- Execute the script sc9_install

Now your installation is completed 🙂 You can browse your website.
Step – 11:
After installing Sitecore, must rebuild the search indexes, and the Link databases.
To rebuild all the indexes:
- On the Sitecore Launchpad, click Control Panel, and in the Indexing section, click Indexing manager.
- In the Indexing Manager dialog box, click Select all, and then click Rebuild.
To rebuild the Link databases for the Master and Core databases:
- On the Sitecore Launchpad, click Control Panel, and in the Database section, click Rebuild Link Databases.
- Select the Master and Core databases and then click Rebuild.
Now you are all set.
Thanks for your time.

Thank you Jitendra. I am preety new to sitecore and was searching for similar kind of article to install on my machine and start learning Sitecore 9.x version. Thanks you so much for this article, its worth reading.
Keep posting and sharing your knowledge.
Cheers!
LikeLiked by 1 person
Thanks Mani. I would try to keep posting such article in future as well. Thanks for your nice words.
LikeLike
How do i replace my local SQL DB’s to Azure DBs
LikeLike